Showing posts with label BBA. Show all posts

Thursday, September 03, 2009

BBA Challenge #13: French Bread

The thirteenth bread in the Challenge: crusty, delicious, baguettes. I tried making French Bread years ago, and frankly, it was nothing special. This, on the other hand, was wonderful. More substantial than your typical grocery store baguette, it was a great balance of crust and crumb. The large portion of pre-fermented dough added greatly to the flavor. I took this to a family gathering and it disappeared quickly. I would definitely make this recipe again next time I want this type of bread.
Next up: Italian Bread. I'm not sure how this differs from French Bread, but I'm sure I'll find out.

Thursday, August 27, 2009

BBA Challenge #12: English Muffins

Here's the latest recipe in the BBA Challenge: English Muffins. These were a standard, enriched dough, quick and easy to make. Different from most breads, these bake in a skillet, then finish up in the oven. I left mine in the skillet a little too long and ended up with some rather dark tops and bottoms, but other than that they were... just okay. I'm not a super English Muffin connoisseur, but these didn't really seem like anything special to me or to Erik. We did enjoy them, however. The first night I made Eggs Benedict, and well, even mediocre bread is delicious when topped with ham and egg and smothered with hollandaise sauce. The second night we used them as hamburger buns. I didn't even eat one plain, but did enjoy them. Even so, if I'm going to make bread I'll put my energy into recipes I've enjoyed more. To be fair, I should probably try the recipe again. To be honest, I probably won't. :>
Up next: Foccacia. Yummm...

Monday, August 17, 2009

BBA Challenge #11: Cranberry Celebration Bread

The 11th bread in the challenge: Cranberry Walnut Celebration Bread. I left out the walnuts in my loaf, mostly due to the fact that I didn't have any. (Which seemed a perfectly reasonable reason to the likes of me.) I don't have much to say about this bread, or much time to say it. It was yummy. And there you have it.
There's milk to be skimmed, a shopping list to be made, and English muffins rising, so I'm off.

Wednesday, August 05, 2009

BBA Challenge #9 & 10: Cinnamon Bread and Cornbread

Gluten Free Cornbread

The last few weeks have been crazy-busy, plus some of us have been sick, and while I've still baked, I haven't made time to post my pictures. (Let alone do any "real" blogging!)
The ninth bread in the challenge was a cinnamon raisin loaf. I used the whole wheat recipe out of Peter Reinhart's Whole Grain Breads; it was delicious. I'm pretty sure I took a picture, but if I did it has disappeared along with the bread.
The next recipe in The Bread Baker's Apprentice was for Corn Bread. This was the only non-yeasted bread in the book, so I thought I'd make it gluten free so Poppy could join us in eating it. So, as a disclaimer, it probably came out very different than the original recipe. I used brown rice flour, which I soaked overnight along with the cornmeal. I also skipped the bacon and fresh corn, so, yeah, I pretty much altered the recipe beyond recognition. But, it tasted good, especially with some cinnamon-honey-butter spread on it! Perhaps someday I'll make it again and stick to the recipe.
Up next: Cranberry Walnut Celebration Bread.

Friday, July 10, 2009

BBA Challenge #8: Cinnamon Rolls (Whole Wheat)

It's hard to believe I'm already on the 8th recipe in the BBA Challenge. While I've really been enjoying the baking and the eating of all these breads, I'm ready to stop using so much white flour! So, this week, instead of the Cinnamon Rolls recipe from The Bread Baker's Apprentice I decided to make the whole wheat recipe from a book by the same author, Peter Reinhart's Whole Grain Breads. I've made the BBA recipe before, so I thought it would be fun to try to make them whole wheat.
I started with freshly ground white wheat berries for a softer, lighter taste and texture. The recipe calls for both a biga and a soaker started the night before. This not only improves the texture of the finished loaf but serves to neutralize the phytic acid present in the whole grains, making them more digestible and unlocking nutrients that our bodies need. Instead of milk or buttermilk in my biga and starter I used kefir, since I had a lot on hand. It was a particularly strong batch and contributed a slight sour flavor to the rolls. Next time I think I'll use something other than kefir. The next day I combined the biga and soaker with yeast, salt, less than half cup unbleached flour, an egg, honey, and coconut oil to form a soft and slightly tacky dough.

Here is the dough with cinnamon sugar. Next time I think I'll roll it out a bit thinner than the half inch called for in the book so that I get more swirl.

Rising...

... and here they are drizzled with a cream cheese and honey glaze.

The verdict? Very good, especially considering they were almost entirely whole wheat. Peregrine said they were the best cinnamon rolls he's ever eaten, but I think it was because I don't normally glaze them. Erik and I enjoyed them as well. I will definitely go back to this recipe next time I make cinnamon rolls. (Which is usually once a year on Pascha (Easter)!) For a healthy version of a very decadent treat, these did not disappoint! I plan to try more of the Whole Grain Breads recipes as the BBA Challenge progresses.
Next up: Cinnamon Raisin Bread.

Wednesday, July 01, 2009

BBA Challenge #7:Ciabatta

It's hard to believe we're already on week seven of The Bread Baker's Apprentice Challenge. I decided to do a more in depth post on this week's bread since it's one of my favorites, and is possibly the recipe from BBA that I've made the most often: Ciabatta.
A few years ago I sat on a friend's couch and flipped through a library copy of The Bread Baker's Apprentice. While I was no stranger to baking bread, I'd wondered how one could achieve the soft, moist crumb, and crispy crust of the artisan breads from the bakery. And there, in my hands, was the answer. I wasted no time in requesting my own copy from the library, and devoured the first section of the book, in which Peter Reinhart goes into much detail on the art and science of bread, of yeast and enzymes, of how manipulating time and temperature produces both subtle and drastic changes. I'm just geeky enough to enjoy that sort of thing! And better yet, he was willing to walk me through it step by step, the amazing process of turning flour, yeast, water and salt into "the staff of life".
Ciabatta hails from Liguria, Italy, and has spread across the Italy, and across our country as well. It literally means "carpet slipper" as it's freeform shape apparently can resemble a slipper. It may best be known as the bread that is typically used for making panini. (And trust me, it makes wonderful panini!) It is bread in it's simplest form; water, flour, yeast, and salt. It is the magic of "time and temperature" that transform these most basic ingredients into something much, much more than the sum of its parts.

Poolish, a pre-ferment that is started at least one day prior to baking. A simple mixture of flour, water, and a small amount of yeast, the pre-ferment is key to both the texture and the subtle flavor of the bread. It is left out at room temperature for a few hours, then chilled overnight.


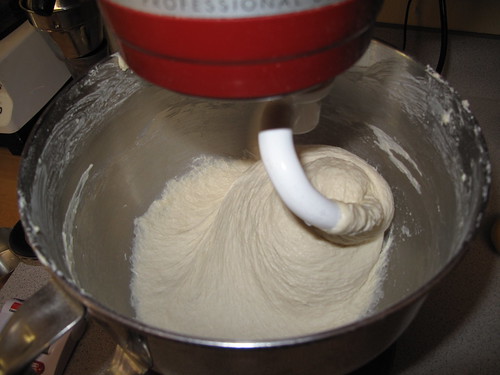
This is the dough toward the end of mixing. It's a very wet, sticky dough and working with it takes a bit of getting used to.


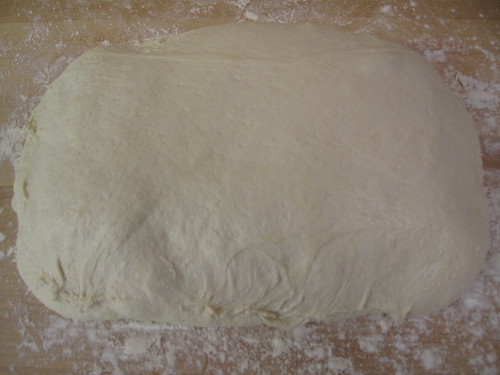
Here is the dough after two rises, the first about 30 minutes, and the second closer to 2 hours. This recipe directs the baker to let it rise on a well-floured countertop.


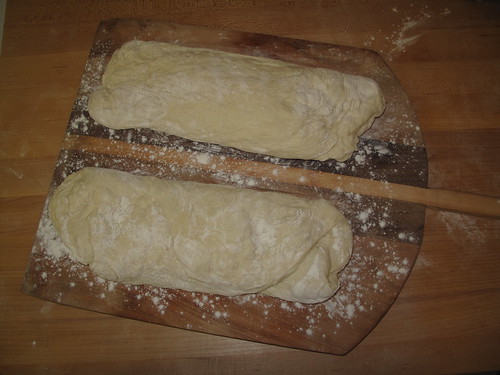
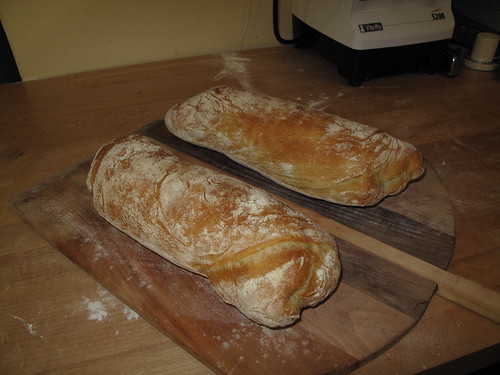
I divided the dough into three portions; two I folded and placed into the folds of my "couche", which in this case is nothing more than some heavy cotton dusted with flour. It serves the purpose of providing structure for the loaves rise during their final rise. Because the dough is so wet, a lot of flour is used to prevent it sticking to hands, countertop, and couche. This is what gives the final product a rather "dusty" look. Incidentally, this dough is never "punched down"; rather, is is gently stretched and folded back together, degassing it as little as possible. This is, in part, what gives the characteristic large open holes.


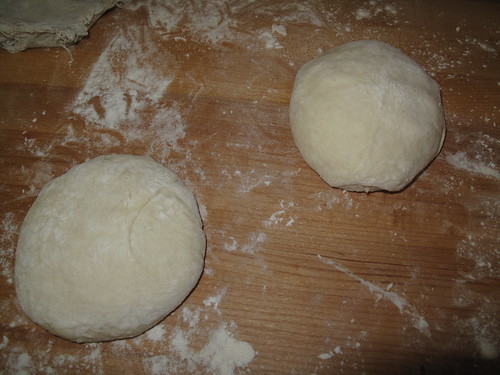
The third portion of dough I divided into two pieces and formed each into a ball. I slipped these into baggies with a drizzle of olive oil (to prevent it sticking to the bag, of course!) These will become crusts for pizza in a day or two.

After about an hour in the couche, the dough is gently lifted and stretched out a bit before being placed on a floured peel. This peel was handmade as a friend and given to me as a gift.


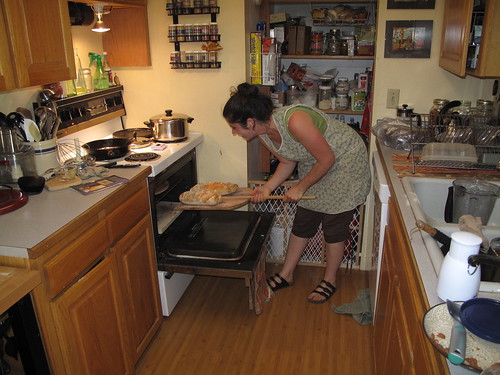
About 15 minutes, 500 degrees, one steam pan, two baking stones (one on the lowest shelf and one on the highest; this simulates a brick oven a little more than just one stone) and three mistings later, the bread registers 205 in the center. The crust is golden and hard to the touch, but as the hot bread cools the steam inside will soften it into a lovely chewiness.

Slightly out of order here, but this is the moment the bread comes out oven, and this is the messy kitchen where all the magic happens! ('Cuz my kitchen staff are ages 6, 4, and 1, and frankly, I think they make a lot more mess than they clean up. But we're working on that...)


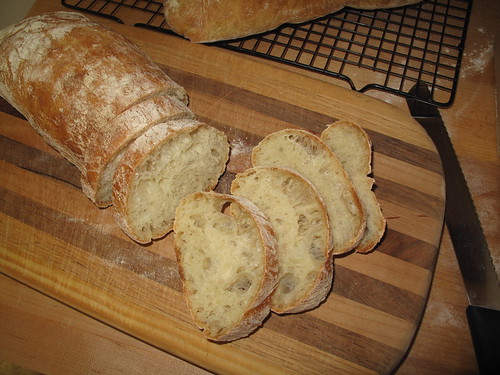
And here is the finished product; ciabatta!


And one last parting shot.

If you're interested in trying this recipe, you can find it here, along with quite a bit of the book. Go! Bake! Eat! Or, as they would say in Italy: Mangia, Mangia!

Tuesday, June 30, 2009

BBA Challenge #6: Challah Bread

I'm lagging a bit on my baking. (Surprise, surprise! I'm very good at starting things and slowing down to a standstill long before they're finished. I think I can, I think I can.... ) Didn't bake at all last week, so am going to try to get two breads in this week. While I'm enjoying the baking and the eating of all this bread, I must say it's way too much white flour for my liking. So, this week, I decided I would do the challah, but only half the recipe. Challah is traditionally made and enjoyed by Jewish families in preparation for the Sabbath. I've never made this recipe before, and it was a very simple and straightforward bread. Enriched by eggs and oil, it has a nice soft texture, and Peregrine appreciated the softer crust. Shaping loaves is not one of my skilz, and I usually just make either sandwich bread or slack-dough bread like ciabatta, so this was a bit of a challenge for me! I started with half the recipe, but needed some hamburger buns as well, so I made a very small braided loaf and six "flat" hamburger buns. (Just enough to hold it all together is the way we like them!) Because I was working with such small ropes for braiding I wasn't able to quite follow the instructions in the book and I didn't pinch the ends enough so they didn't all stay stuck together. In spite of that, it's a lovely golden little loaf. We haven't eaten it yet, but the hamburger buns were delicious.
Coming up next, ciabatta, one of my favorite breads to make and to eat.

Tuesday, June 09, 2009

BBA Challenge #4: Brioche

Last week's recipe was Brioche, a rich, buttery bread that I'd never have made if not for taking part in the challenge. Since I don't own any brioche molds I made do with a muffin pan, which worked well enough even. There were three different options for making this bread; Rich Man's Brioche, Middle Class Brioche, and Poor Man's Brioche. The difference in the three recipes was the amount of butter. I chose the middle ground which still sounded pretty decadent with five eggs and a half pound of butter. Working with such a buttery dough was different; even straight out of the fridge the heat from my hands made it sticky. I did the traditional brioche a' tete shaping; the whole thing had a high learning curve for me. I think I could do better next time, although I'm not terribly inclined to make such a rich bread typically. That said, they are yummy, a bit reminiscent of a croissant. And spread with a little chocolate ganache they make a very nice snack.

Thursday, June 04, 2009

BBA Challenge #3: Bagels

The third recipe in the BBA Challenge is bagels. I'm not much of a bagel connoisseur; I enjoy one once in a while but I could take them or leave them. I have not spent my adult life attempting to recapture the perfect bagel of my childhood; in fact, I don't remember bagels as being part of my childhood at all. So I really can't say if this was an "authentic" bagel or not, but I did think it was pretty yummy. Chewy on the outside, soft and moist on the inside. They're not as much work as they seem and were a nice treat. I only made half the recipe, which still made 8 decent size bagels. And, I had some awfully sweet helpers.


Monday, May 25, 2009

BBA Challenge #2: Christopsomos

Just before baking


Christopsomos

This week's bread was another recipe that was new to me: Artos, or Greek celebration bread. There are variations depending on the holiday, but I chose Christopsomos, or Christ Bread, which is made for the Feast of the Nativity, or what we typically refer to as Christmas. Slightly sweet, spicy, and filled with nuts and dried fruit, this bread was both delicious and beautiful. It reminded me a lot of the Italian Easter Bread my Mom always makes on Easter, although that doesn't have the spices.
I made two batches of this bread and shared with a few different people, as it makes a gigantic loaf! I chose to use the poolish starter, since I don't yet have any barm going. I used melted butter instead of olive oil in both batches. Also, I used toasted hazelnuts in one batch and slivered almonds in the other. We're not big walnut fans, but both of the other nuts were quite nice along with cranberries and currants. With the first batch, I forgot to start my poolish the night before I wanted to bake, so I made it in the morning. Then I got home late and rushed my dough through rising by putting it in a slightly warm oven. It worked, but the result was less than beautiful. It made one huge loaf that visually looked a lot like stretch marks! It was yummy, but I wanted to try again and see if I could do better on the shaping.
I started my second batch a few days later, with some of the leftover poolish, which had now had time to develop a little more character. I left plenty of time for slower rises, at room temperature, which was probably about 65 that day. Also, I decided to make two smaller loaves instead of one large one. The dough rose beautifully, was much smoother, and didn't have the uneven appearance of my first loaf. I'd thought the first loaf came out a bit dark so I tented the second batch with aluminum foil after the first twenty minutes of baking. I used the glaze on the second batch, and while it was a bit sticky, it really brought out the golden color of the crust and made it look pretty. It also had a nicer texture, not quite as fluffy, but still very soft.
I still had one cup of poolish, so I decided to make one more batch of bread. I left all the spices and orange rind out of the final batch and shaped half of it into hot dog and hamburger buns for our weekend cookouts. The result was very nice, soft buns that held up well to the meat but didn't overwhelm it. I actually still have half that dough in the fridge and will make pizza with it tomorrow night.
The Christopsomos was wonderful, and I will definitely make it again. I don't know that I will do the fancy shaping, but who knows! I thought it would have made great toast or french toast but really liked it plain with some butter.
Moving along this week to bagels. I haven't made those in a very long time, so that should be fun, and also is one the kids will likely enjoy helping out with.

Monday, May 11, 2009

BBA Challenge #1: Anadama Bread


Let the baking begin! Today I made the very first recipe for The Bread Baker's Apprentice Challenge, and it happened to be one I haven't made before, Anadama Bread. (You can find the recipe here.) It's a nice airy loaf with a hint of molasses and a surprising bit of texture from the cornmeal. The caption on the photo was added by my husband, who apparently liked it. I think it would make wonderful toast, (will know for sure in the morning), and also a nice sandwich.
I made a couple slight variations to the recipe in the book. First, I added a Tablespoon or two of liquid whey to the soaker. This serves the purpose of neutralizing the phytic acid in the corn and unlocking more nutrients. (Phytic acid is an anti-nutrient found in whole grains, nuts, and some beans. It binds nutrients, making them difficult to digest. Soaking the grains in water with a bit of whey, yogurt, buttermilk, etc. makes them much more digestible.) Secondly, I didn't have the "light" molasses called for in the recipe, only blackstrap. I used about half molasses and half honey so the molasses wouldn't overpower the flavor. I'd say it came out just right. Also, I freshly ground dried corn, and the course setting on my grain mill still made it come out more like a fine cornmeal than like the polenta called for in the recipe. I thought it added a very nice little crunch nonetheless.
I decided to bake only one of the two loaves tonight, and left the other one, shaped, to proof in the refrigerator for a couple of days. I like experimenting with "time and temperature" and will be interested to see how the bread differs after an extended fermentation. I'll update this post and let you know after I bake it.
Update on Second Loaf: I had intended to bake the second loaf on Wednesday, the third day after mixing the dough. However, I didn't get to it until Thursday. I was a little concerned because by Wednesday evening the refrigerated loaf had fully risen and begun to collapse. I took it out Thursday morning, left it out for a few hours, and it rose fairly well. It baked up beautifully, and while I don't think it ever rose quite as high as the first loaf, I think I preferred it. It was a little more sturdy, but not at all dense, and had a more developed and complex flavor.
I'm excited about trying new recipes, and my family is excited about eating them.
Finally, I thought I'd share a few things I've learned that are helpful in baking excellent bread.
  • If you have a kitchen scale, weighing your ingredients is more accurate than scooping them into measuring cups. All of the recipes in BBA list weights. Use them, if possible.
  • Use filtered water for your bread, as well as for your steam pan and spray. The less "taste" your water has, the better your bread will be.
  • I prefer to use SAF Instant Yeast. You can buy it in a large-ish package at a restaurant supply store and it's much cheaper than buying the little jars or packages at the grocery store. Also, you don't have to pre-soak it in water; you can add it directly to your dough.
  • Buy an oven thermometer and check your oven temperature. Mine tends to be off by about 25 degrees, and that's helpful information. (If you're going to be using steam, take the thermometer out so the glass doesn't crack. Ask me how I know!)
  • I usually preheat my oven to 25 degrees hotter than the recipes calls for, than turn it down after putting the bread in; this compensates for the heat lost when opening the oven door, and allows for a more even baking temperature.
  • If a recipe tells you what the internal temperature of the finished loaf should be, use a meat thermometer, instant read if possible. This is a much more accurate test of doneness than time (or thumping.) Set your timer for at least 5 minutes earlier than the cooking time, and check then. Better to give it a few more minutes if it's not done than to overbake it.
  • Finally, the waiting is the hardest part! But, allowing the loaf to cool really does improve the texture and slice-ability of the bread, if that's important. Then again, there's nothing like a warm slice of bread thickly spread with melty butter.....

Saturday, May 09, 2009

The Bread Baker's Apprentice


I've been baking bread from this book for a few years now, and recently found this group of crazy bakers who plan to try every recipe in the course of a year. I tend to make the same few recipes over and over, so this should be fun. If you've ever wondered how to bake crusty artisan breads or just expand your bread repertoire, this is an excellent book. The first section of the book explains the science of bread; how all the enzymes, gluten, time, temperature, and various ingredients work together to make bread what it is. I found it a fascinating read. When my kids are older this is going to find its place in their homeschool curriculum, complete with lots of baking of course! The recipes themselves are well written by Peter Reinhart, and are well laid out and easy to follow. And the bread... delicious! Now, if I could just get Erik to build me a stone oven in the backyard....

Does anyone else want to join me in the challenge?